Friday, August 27, 2010

Daring Bakers: Aug 2010 Baked Alsaka (Nutty & Toasty Meets Cool & Creamy)


“Another cake & Ice-cream challenge”,I sighed as I read the August Daring Bakers Challenge. I made a massive swiss-roll Ice-cream cake just last month for the DB challenge but was happy that this one was a Baked Alaska. I have seen so many chefs making this on tele and lusted for a slice of it, but never dared to make it. Well, it was time to shed my inhibitions, don the imaginary chef’s (toque) hat ,order the chef’s blow torch on Amazon (Oh I am such an internet junkie) and get on with the challenge. First I made a huge batch of strawberry ice-cream and let it freeze. Next, a browned butter pound cake. Assembling them and waiting for them to freeze was the most difficult thing to do, as I simply wanted to pipe the meringue and use my blow torch.
The August 2010 Daring Bakers challenge hosted by Elissa of 17 and Baking, challenged us to make a pound cake using the theme of beurre noisette, or browned butter to be used in either a Baked Alaska or in Ice Cream Petit Fours. The sources for Elissa’s challenge were Gourmet magazine and David Lebovitz’s “The Perfect Scoop”.
Strawberry Balsamic Ice-Cream similar to this recipe
Ingredients
Strawberries – 400g hulled and slices
Raspberry Balsamic Vinegar – 1tsp
Sugar – 200 grams
Egg yolks – 10
Whole Milk – 500ml
Heavy Cream – 500ml
Vanilla Beans scrapped from a pod
Method:
Toss the strawberries in balsamic vinegar and a 1bsp of sugar and leave it aside for the flavors to mingle. Meanwhile, bring the milk, vanilla and cream to a boil in a pan and whisk the yolks with the sugar until pale. Pour the hot liquid over the yolks whisking all the time and bring the mixture back to a boil, stirring all the time until you get a custard consistencyand ensure the mixture coats the back of a spoon.  Strain the mixture and let it cool. Whizz the strawberries in a processor and combine it with the yolk mixture. Freeze in an Ice-cream maker according to manufactures instructions or freeze in an air-tight container churning the mixture in a processor every 2-3 hours as it freezes at least 3 times. This is important to break the ice crystals.
For the Browned Butter Pound Cake
I followed the recipe from here, but just made half the quantity and baked it in a smaller tin.
For the Meringue
Ingredients
Egg Whites -  100 grams
Sugar - 1/2 cup
Cream of Tartar - 1/4 tsp
Salt - 1/4 tsp
Method:
Whisk the egg whites until frothy and add 1/4 cup of sugar, cream of tarter, salt and whisk on high until soft peaks form. Add the remaining sugar and whisk until stiff peaks form. Fill up a piping bag (fitted with a star or round nozzle) with this beautiful meringue.
Assembly1: Take a ring mould and cover the base with a cling film leaving an  overhang. Cut off equal bits of cakes and place into a small ring mould. Scoop out the ice-cream and smooth on top of this. Place another layer of cake and finish with a smooth layer of ice-cream, gather the ends of cling film and cover it. Freeze for a couple of hours until firm. Un-mould the ice-cream cake, pipe the meringue onto this in whatever pattern you fancy. I used a spatula to spread the meringue like frosting and lifting it off randomly to create the ruffled look. Freeze this for a couple of hours.
Assembly 2: Take a bowl and cover the base with a cling film leaving an overhang. Cut out a round piece of cake using the bowl's rim as template. Scoop out the ice-cream and smooth it into the bowl and freeze until required. Un-mould the ice-cream onto the cake and pipe small stars, freeze for a couple of hours.
Using Blow-Torch: Work in a spacious clutter-free area to use blow-torch and make sure there is ventilation. Slightly toast the meringue using a blow-torch moving it constantly on all sides until brown.
Verdict: I loved making this in spite of struggling to make my blow-torch work, making frantic calls to 'S' as I tried to fill it with butane."Oh there is a hissing sound, I guess there is a leak" I yelled and in an attempt to turn it off I somehow managed to turn the flame on! Not wasting a minute, I quickly toasted the unbaked alaska and brought them back to life. It is a pretty straight forward challenge and easy if you make the components within a span of few days. Thanks again Elissa for hosting this month's challenge.


Tuesday, August 24, 2010

Roasted Peaches and Berries Ice-cream & My Summer Indulgence


Summer is leaving us soon and that makes me cry. I love making ice-creams and more so eating them. When the markets are flooded with strawberries, raspberries, peaches I love buying loads of them and enjoying TV dinners with home-made ice-creams, fresh fruit salads, fruit crumbles, clafoutis..(More eye-candy after the recipe)."S" was so worried looking at the space in our fridge, as most of it was pretty much occupied by these gorgeous summer goodies, that he tried his trick and scarred me 'Looks like the berries are rotting'. I quickly gave them a rinse and tossed the berries and some peaches in the oven to roast. I had time the next day to make and chill the custard and by EOD the machine was churning a batch of this best ever ice-cream. "S" thinks the ice-creams that I scooped out for these pictures have monster faces..Look closely and let me know what you find ;-). 
Ingredients
Peaches - 3 pitted and slices
Berries - 250 grams (I used strawberries and raspberries)
Vanilla Sugar - 3 Tbsp
Egg Yolks - 5
Milk - 200ml
Heavy Cream  - 250ml
Sugar - 80 grams
Vanilla beans scrapped from a pod
Method: Preheat oven to 180C and line a baking sheet with parchment paper. Toss the berries and peaches in vanilla sugar and roast in the oven for about 45 min or until slightly caramelized. While its cooling, make the custard. Beat the sugar and yolks until pale for about 5 minutes or so. Bring the cream and milk to a boil along with the vanilla beans and pod. Whisk in the hot liquid into the yolk mixture, bring it back to a boil and stir until it coats the back of a spoon (about 5 minutes or so). Strain the mixture and allow it to cool. Slightly mash the fruits using a fork and whisk this into the cooled custard. Freeze the mixture in an ice-cream maker, according to manufacturer's instructions, until semi-set and freeze further in an airtight container in the freezer for a couple of hours. Leave it at least for 30 min at room temperature before scooping and serving. If you do not have an ice-cream maker freeze the mixture in an air-tight container and whip it up in a processor or hand beater every 3 hours for at least three times as it freezes. This step is important to get a smooth ice-cream as it gets rid of the ice-crystals.
VerdictVery moreish, indulgent and scrumptious ice-cream. This is very different from all the ice-creams I have ever made or tasted. Gorgeously smooth, the roasted fruits give it a nice flavour. Once thawed it refreezes very well. 
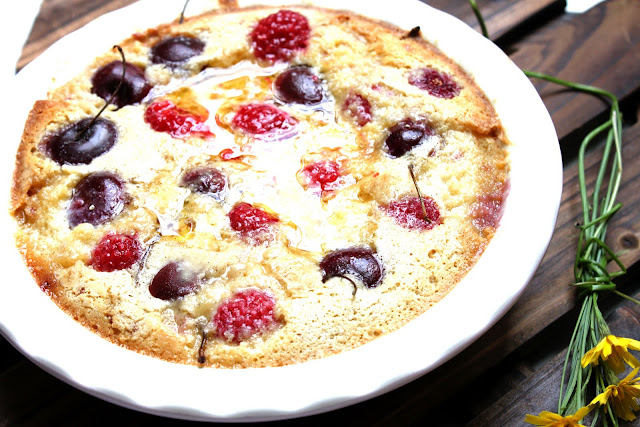
Rapsberry-Cherry-Clafoutis
Simple Fruit Salad
Fruit Salad with Mascarpone-Vanilla Cream

Sunday, August 15, 2010

Strawberry-Vanilla-Bean Macs for MACTWEETS Mac Attack #10 - A SUMMER FLICK


I thought black background might me good...obviously I was wrong.
MACS in the oven ;-)
Waiting to get the skin.
Remember the famous theme music? tan tan tantan...tan tan tantan...yp that's mission impossible one of my favourite flicks of all time. I somehow love action movies more than 'S' does. Hot guys make everything possible from jumping off a building, driving high speed vehicles, using hi-fi gadgets and also romancing chicks amidst all high-octane drama, not to forget their perfect 6-pack abs even in difficult times. Some of my favourites include Bond movies like Tomorrow Never Dies, The World Is Not Enough, Casino Royale...then the blue-eyed boy mel gibson's Lethal Weapon, gorgeous Bruce Willis's Die Hard series, Arnold's Terminator series...the Sci-fi flicks like Jurassic Park, Independence Day, X-files, Gattaca. I still remember...when Jurrasic Park was released we went to watch it with other kids as a school trip, then watched it again with my parents, my friends and have watched it gazillion times on tele and still will watch it every-time its aired. I dont think I will be ever tired of watching these flicks, curling up on my sofa with a big tub of spicy buttery popcorn. I have to admit I am big time movie buff and thank god that 'S' shares my liking except that some of his favourites are way too boring. (Gowd how can someone watch Startrek TOS..yawn yawn). Just when you thougt I am hopeless in matters of heart...I also love mushy romantic movies, animated and bollywood flicks but would need a separate post to mention my favourites. But will mention (Jamie this one is for ya!) Pretty Women...how gorgeous does Julia Roberts look in that?
This month Mac Attack challenge was to create that perfect macaroon inspired by a movie, an impossible mission at times! These Macaroons, they have a mind of their own too! So this month to make this Mission Impossible  possible I tried to make them with my Lethal ingredients like strawberry-vanilla inspired by romantic flicks and dark chocolate inspired by sci-fi/action flicks. Wild gone wilder recipe, but the Macs turned out perfect. They got their Happy Feet and did a bit of Dirty Dancing, while some were Gone in 60 seconds (not literally)! I love this summer flick idea, thanks to  Mardi of eat.live.travel.write,as the possibilities and inspirations are endless. I enjoyed my saturday watching Predetor 2, Lethal Weapon 3 and a bollywood flick!
Strawberry-Vanilla-Bean Macaroon adapted from mytartlette
Ingredients
For powdered strawberries:1/2 cup strawberries
For the macaron shells:Egg whites - 45 grms 
Granulated Sugar - 15 grms 
Powdered Sugar - 100 grms 
Ground Almonds - 55 grms 
a pinch cream of tarter
Vanilla beans scrapped from a beanPowdered Strawberries
Pink food colouring Method:
For the strawberries:
Hull and slice the strawberries and place over a kitchen towel cut side down and leave this in an air-tight container overnight. I found this step extremely useful as the strawberries were very fresh and I knew if I left them in the oven they would leave out a lot of juice. The towels soak most of the juice.
Preheat your oven to 150C and place the strawberry slices in a single layer on a parchment lined baking sheet and let them dry in the oven for about one hour. Let them cool completely. Powder these in a coffee grinder/mixer.For the macarons: Whisk the aged egg whites (I aged them for 5 days in the fridge) until foamy, gradually adding sugar and cream of tarter until a glossy peaks. Pulse the almonds, vanilla beans,powdered sugar, few drops of colour and powdered strawberries processor until finely ground. This is very important to get the strawberry bits extra fine and also incorporate the colour. Add them to whites, give it a quick fold to break some of the air and then fold the mass carefully until you obtain a homogeneous batter. Fill a piping bag with a plain tip with the batter and pipe small rounds using a template onto parchment paper or lined baking sheet. I got about 12 Macaroons out of the above quantity. Let the macarons sit out for for an hour or so to form a skin. Preheat oven to 150C and bake for about 20 minutes, depending on their size. Let cool. Transfer to a wire rack and cool further.
For the Chocolate Ganache:
Ingredients
Dark Chocolate 75 grams
Heavy Cream 1/4 cup
Method:
Heat cream in a pan and pour over broken chocolate and whisk until the chocolate melts. Leave to cool.
To pipe fill a piping bag with cooled ganache and pipe onto cooled macaroon shells. Let them cool a bit in the fridge for the icing to set.
Verdict: These are by far best macaroons I have ever made...The chewy shells and the smooth dark chocolate ganache were pure indulgence, a perfect combo. I was a bit worried about using the strawberry powder in the macaroons but trusted helen and followed her steps, although I did leave it for a bit longer in the oven.

Friday, August 13, 2010

Easy Okra with Potatoes


Love the way she is grinning with those Potatoes she just pulled out!
Muddy Onions and Potatoes
Apart from cooking, photographing and writing about food, growing vegetables and herbs has been my favourite. Apartment living has given me little scope, other than growing odd herbs and tomatoes in pots that sit on my kitchen top yearning sunlight (which is a rarity these days),not much of 'gardening' I would say! A couple of months back, when my friend said she wants to grow her own veggies, I was thrilled. My many visits to her place were filled with proud tours around her garden, talking about how much she wanted to grow her own ginger and about when the potatoes and onions would be ready and so on. So when it was time to harvest the potatoes and onions I was invited and I must say this was one of those visits I was looking forward to. We had fun time pulling out the peeking onions and muddy potatoes from its roots and were amazed at how the worms had eaten some of the large potatoes. As I got back home my mind was busy searching for recipes that I could make with the loot. Finally I settled for a simple curry that I make with potatoes and okra.
Okra is a common vegetable in India and is  mucilaginous resulting in the characteristic slime when cooked ( the mucilage contains a usable form of soluble fiber source-Wikipedia). The trick is to wash them thoroughly and dry them completely before cutting and cooking. 
Okra with Potatoes
Ingredients
Okra  - 200 gms chopped into chunks
Potatoes - 200 gms skin scrubbed and chopped into chunks
Onions - 1 or 2
Ginger-Garlic Paste - 1 Tsp
Red Chilli Powder - 1/2 Tsp
Turmeric - 1/2 Tsp
Ground Cumin - 1/4 Tsp
Ground Coriander - 1/2 Tsp
Garam masala - 1/2 Tsp
Salt as per taste
For Seasoning
Mustard Seeds - 1/2 Tsp
Cumn Seeds - 1/2 Tsp
Oil - 1 Tbsp
Fresh Coriander for garnish
Method:
Heat oil in a pan and splutter the mustard seeds, followed by Cumin seeds. Add slices of onions and sauté them till transparent. Now add the pastes, powders, salt , potatoes and cover, cook till the potatoes are 3/4th done, stirring occasionally and sprinkling water if needed. Now add the okra and sauté till the okras are done. Do not cover and cook at this stage or add water, doing so will make the okras slimy. Taste for seasoning and toss in fresh coriander. Serve this with naan or rotis and yoghurt.
Verdict: The potatoes were so fresh that they hardly took 3 min to cook..and I could scrape their delicate skin while washing them. Growing your own Veggies is definitely worth it..The potatoes just took about 3 min to cook and I could scrape the skin while washing them. Although I have made this curry many times, the onins and potatoes made it extra special this time!

Monday, August 09, 2010

Secret Agent Role,Gluten Free - Vegan Cupcakes + A Birthday Cake

Making Birthday cakes always make me happy. And playing a secret agent...even better...Okay let me explain...it was a dear friend's birthday last week and I was supposed to make the cake secretly. To do this I had to first of all discuss the micro details with her daughter (who shares the same passion for baking like me) without her mum getting a hint, then I get a SMS from her on the Dday 'Dont text Mum happy bday coz she doesnt know that U know, then she'l know U'l make a cake'. I soon realized there are other friends I had discussed this with and had to text everyone the first thing to make sure this still remains a secret...phew...There is so much more I had to do to make sure all this was hush hush...but enough of the details for now...back to the cakes. I made a Chocolate-Hazelnut-Raspberry cake and frosted it with plain Vanilla-Mascarpone cream finished with a sprinkling of Vanilla-White Chocolate shavings. She likes simple cakes, so I skipped frosting the sides. For her daughter who is a vegan I made the egg-less Chocolate-Hazelnut-Banana cupcakes using Hazelnut Powder, Quinoa Powder and Brown Rice Flour making it gluten-free as well. I frosted it with Soy cream and Nutella (which is now becoming an obsession of mine..)
Verdict: Both the cakes were deliciously moist and very chocolatey..raspberries and banana kept them really moist. I personally liked the raspberry version..somehow the tartness of the berries complement the chocolate. And the cakes went down a treat.
Do email me if you need the recipe as I am not posting it as yet.

Tuesday, August 03, 2010

Dangerous Brownies with Raspberries and White Chocolate Chips

These babies are by far the best brownies I've ever tasted. I whipped these up in no time after reading this (couldn't resist myself in making them immediately). Alice's brownies were pretty easy to make, in fact I could make them in my sleep. Just melt a few ingredients, stir in the flour and eggs and whisk like mad...And frankly you are just an hour away (I've considered the chilling time) to the worlds best brownies (without the £10.99 price tag). I call them dangerous for a reason. They are very addictive. I have added the seasons best raspberries and a a handful of white chocolate chips to make it even more naughty and irresistible. It is a very forgiving recipe and feel free to add nuts, dark chocolate chips...anything you fancy.


For the Dangerous Brownies 
Ingredients:
Good Quality Unsweetened Cocoa - 82 grams
Sugar - 280 grams
Cold Eggs - 2
Butter - 141 grams
Flour - 66 grams
Salt - 1/4 tsp
Vanilla Extract - 1/2 tsp
Raspberries - A handful
White Chocolate chips - 50 grams
Method:
Preheat oven to 170C. Grease and line a 8X8 square tin with parchment paper. Combine the butter, sugar, cocoa and salt in a bowl and melt this over a double boiler i.e this bowl placed over a smaller pan with simmering water. Keep stirring until the butter has melted, the mixture is fairly warm when your finger is dipped and the looks grainy. Set aside to cool a bit. Once cool, stir in the vanilla and cold eggs. Whisk like mad until you have a smooth mixture. Now add the flour and whisk vigorously with a wooden spoon until smooth. Pour this into the prepared tin and smooth the top. Bake until skewer thrust into the centre comes out slightly moist about 35-40 minutes. Allow to cool completely and refrigerate for a few hours before cutting into squares (This step ensures you get clean lines when you cut the brownies).


Verdict: After the 1 hour wait to cut them which seemed ages, I got to lay my hands on a handsome piece. Gooyey on the inside, with juicy raspberries and sweet white chocolate bits. I was in chocolate heaven. (In fact I am writing this as I bite into another chunky piece...nirvana)!

Design © 2011 Laura Jane Designs